Tuesday, December 27, 2011

Monday, December 26, 2011

Design Wall Monday

Last Design Wall Monday for 2011. That means 2012 is quickly approaching...I'm getting stressed just thinking about everything that I know needs to happen in the coming year. 

But I still have a few days of 2011 to enjoy. The last Thursday of the year I usually attend a mystery quilt class and that's what I'm working on this week. We need 2 1/2" strips...I have plenty of those. And some light colored squares...I need to cut those before Thursday.


I'm going with two sets of Bali Pops I've had for a few years. It is time to use them since I bought several new colors of the latest Bali Pops.


I guess that was a little Christmas present to myself!

Speaking of Christmas...it was lovely. It snowed lightly the entire day. I stitched on some stockings...


I'm mailing my Christmas Letters today...I rarely get them out on time...maybe next year!

Thursday, December 22, 2011

Thursday Recharge

I got eight hours of sleep last night...that rarely happens. No dogs needed potty breaks...we had a nice long walk yesterday...I think we will do another long walk today plus I'm planning to bathe both dogs. Jenny and Tonka will be all nice and sweet smelling for Christmas morning.

The only thing left on my Christmas list is cards...waiting for son # 1 to send me a photo with him and an airplane...because it's always about airplanes! Meanwhile...


Still working on a few projects. Patchwork Santa is in my studio but the last few evenings I've been watching TV with son #2 and hubby so I've started another stocking that I keep in the great room...


I found a basket that fits perfectly in one of my end tables.


Another stash of goodies!


Doesn't look like I have done much but it took me four nights to stem stitch pine needles on the stocking background. Next I get to start working on the main Nutcracker so that will look a little more impressive.

I've really been enjoying reading the 2012 UFO lists being posted at Patchwork Times. It's great to see that I am in good company with others who have lots of projects to finish.

And just one note about the new house...it's almost time to paint walls! More decisions...


Tuesday, December 20, 2011

UFO Challenge 2012

I am amazed at the projects I finished on my list for 2011, even though I only got through seven of the 13 on my list. I guess it's proof that setting goals helps!

2011 UFO Challenge Completions

I am presented with some challenges in the New Year that have required me to consider parameters for my 2012 UFO list. I have to finish building a house, sell my current home and move in 2012. This will cramp my style but I know in order to keep my sanity there must be time spent quilting. So maybe I should focus on hand work and machine work that can be done on my domestic sewing machine. In other words...longarm quilting is what I have decided to "give up" for at least the first half of 2012. The UFOs I didn't finish in 2011 all need quilting so those will have to wait. (Sigh.)

UFO Challenge 2012


1 - Art to Heart Small Stockings
 A carry over from the 2011 UFO list. They just need a touch of "quilting" and then final construction.


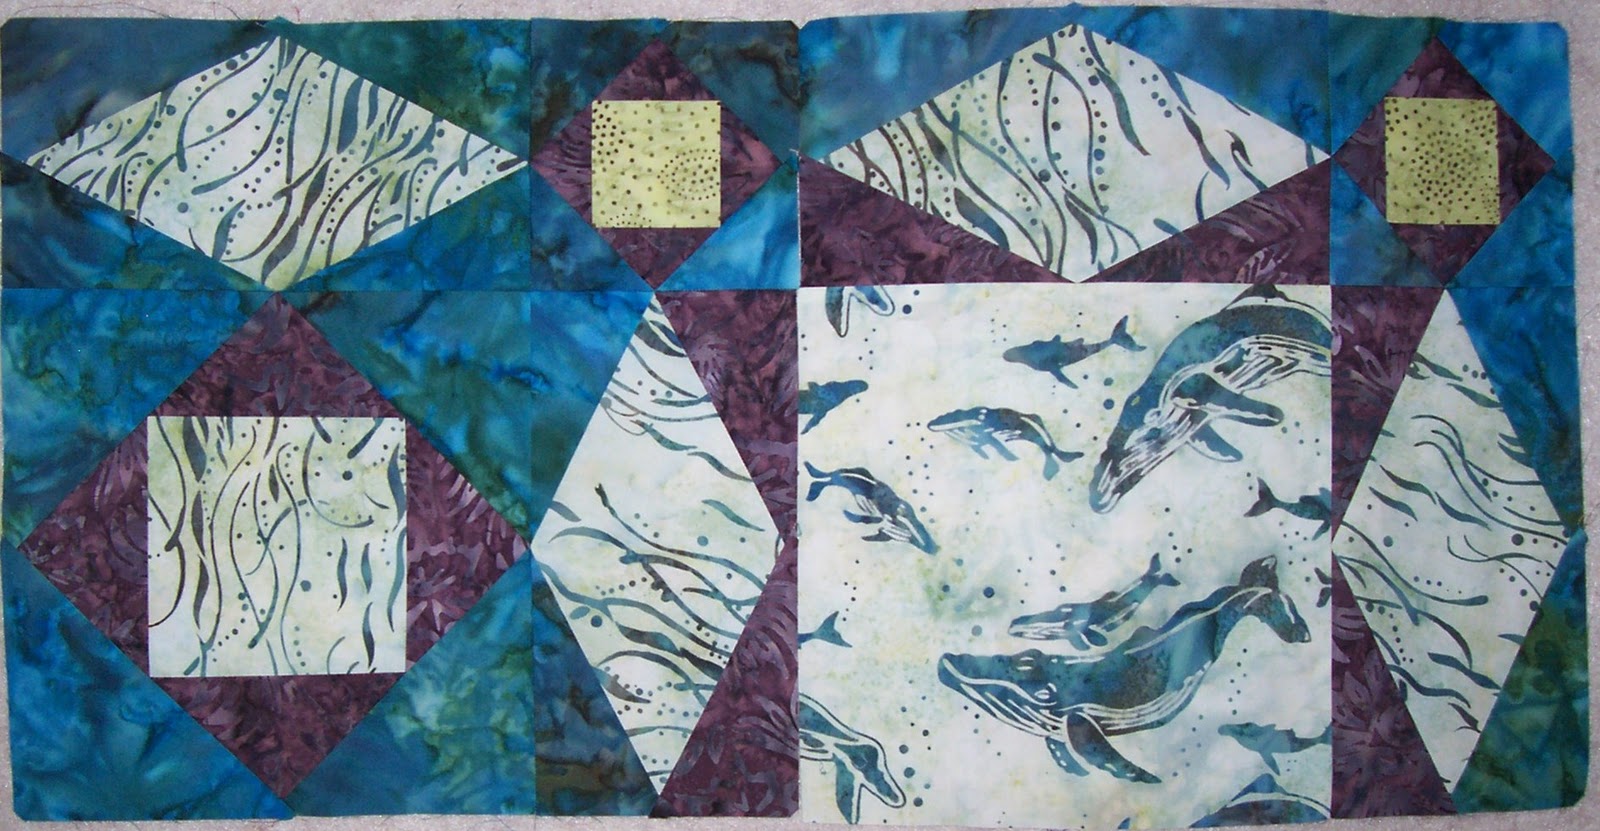
2 - Alaska Shop Hop Quilt, (2009) 
I have all of the blocks constructed and motifs appliqued with fusible web. The main stumbling block is outlining all the appliques with top stitching. 


3 - Sashing and border construction of the 2009 Alaska Shop Hop Quilt


4 - Moda U Flower Baskets Quilt
Just a few blocks left to applique, then the tough part of deciding how to finish it. The original design is huge and I don't want to make it that big. It calls for lots of filler patchwork blocks. 


5 - Shivery Snowman Quilt 
This design calls for 12 patchwork blocks and a total of 12 applique blocks...I've got quite a bit of work to do on this one. 


6 - Aloha Friday Quilt
I  purchased this pattern on a trip to my favorite quilt store in Lihue, on Kauai. I bought this when the boys were little...now they are men! Not sure what I would ever do with this quilt if I finished it but it might be a nice one to have in the stash as a present.


7 -  Alaska Shop Hop Quilt - 2010
I have a ton of work to do on this one...so the construction will definitely get it's own month. There are eight more blocks of fusible appliques and then top stitching.


8 - Complete Sashing and Border for Alaska Shop Hop 2010


9 - Finish Pieceful Kwilter Blog BOM Flimsy


10 - State of Grace blocks

Chugach Mountain Hike
Talkeetna River Trip
11 - Finish borders and determine quilt design for two Alaskana quilts.


12 - Make blocks for Homer Departure Quilt


13 - Green Tea needs borders or more rows to make larger.

If all goes well, I will have 11 quilt tops to add to my list of five tops that need quilting. I did finish quilts in 2011 that were new starts and completions but I'll save that recap for another post. And of course...I have a few projects I'd like to start...it never ends...but I think that's the idea.

Monday, December 19, 2011

Design Wall Mionday

As my husband would say, "Another Stocking?


Time to hand quilt it!

I'm also working on my list of UFOs for 2012...

Sunday, December 18, 2011

Making Bucilla Felt Stockings - Patchwork Coat


It's time to start Santa's patchwork coat.


Simple embroidery to create the fabric patches.


Each patch is attached with a bit of stuffing underneath. 


Friday, December 16, 2011

Making Bucilla Felt Stockings - Santa's Headstart


Here's the reference photo of what I'm striving for...


It is time to embroider Santa's face. I think the embroidery is the most challenging part of the stocking...especially the faces. The cheeks and eyes are done with two strands of floss for a satin stitch. What works for me is to start in the middle and work my way out.


The key to a pretty satin stitch is to have both strands of the floss lie flat, next to each other, not twisted.  It takes patience to stitch just outside the printed line so it is covered by your stitches. I have made 30 of these kits and I still pull out a stitch if it doesn't look right. The bottoms of the cheeks will be covered by Santa's mustache so I concentrate on the parts that will show.


Once the embroidery on this piece was done...eyes, cheeks and Santa's eyebrows, I needed to add a little stuffing and applique in place.


With the face appliqued down, I added the nose which is a piece of felt with stuffing, appliqued through all the layers to add dimension.


The white hat band for Santa's hat was next. The sequins went on the piece first and then I appliqued it with stuffing.


Santa finished the night with his hat completed.

Making Bucilla Felt Stockings - Start Stitching


It's time to start stitching. For this stocking, the first step is to stitch the snowflakes on the background. These are made with a simple straight stitch on the lines with sequins and beads added on the dots.


The sequins are secured with a clear bead. You come up the center of the sequin and the bead with the thread and then loop under the bead and then back down through the hole of the sequin. I'll work on getting a picture...my last attempt came out blurry. The next step is to make the holly leaves that go across the top of the stocking. You can see the green felt piece with the holly pieces.


Here are the holly leaves ready for embroidery. I've laid them on the stocking top. I have made the decision not to attach these leaves until the end...from experience I know my thread will get caught on them while I work on the rest of the stocking if I put them on now.


The third step is appliqueing Santa's hat which is stuffed with fiberfill. I usually stitch one side down and then grab a piece of fiberfill to enclose as I whip stitch. I had to add sequins before appliqueing the piece of Santa's hat.


Here's where I ended last night. My holly leaves are embroidered and stored for later attachment. Where there are three dots will be red sequins and beads to attach the leaves to the stocking top. Tonight's step will be embroidering Santa's face.

Thursday, December 15, 2011

Making Bucilla Felt Stockings - Prepping

Looking at my stocking collection inspires me to make more!
A quilter needs to have a Patchwork Santa. 


There are several websites that I browse to see the latest Bucilla stocking kits. I check out Colray Crafts  because their picture size allows me to see the details of the stockings. This is a company in the United Kingdom so I don't order from them...I'm pretty sure the postage would shock me. Since I make many of these kits, I order mine mostly from Supply Craft, a company that has the best prices daily on the internet. You should be able to pick up a current design kit for under $20. In the lower 48 states you might be able to find these kits at Hobby Lobby or Michael's and use your coupons! Designs that are older can be found on Ebay, though you may be shocked at the prices the most desirable kits sell for...I've seen them sell for over $100...and you still have to make the stocking! 


Lets get started. Most of what you need, comes in the kit. All the felt pieces are stamped. Every piece is numbered in the order it is placed on the stocking. Also included are sequins, floss and two needles - one for beading and one for general stitching. You will also need to provide scissors and fiber fill to stuff parts of the felt that are appliqued. I have learned from doll makers that fiberfill brand is important...Fairfield 100% polyester Fiberfill...this is the ideal one to use...you can find it at JoAnn's in a mostly blue colored wrapping.


The first thing I do is press the felt pieces before they are cut. I'm not sure of the content on the felt but it's most likely polyester so it might melt! I put the felt between two Teflon pressing sheets. If you do any fusible web applique these pressing sheets are so helpful. (In other words...gets some!) If the creases are reluctant to press out I lightly spray the back side (non-printed) of the felt with water and press again between the Teflon sheets. 

Pressing makes a huge difference. I see sellers on Ebay who have put hours into making these stockings and then try to sell them completed but the whole stocking is ruined by creases that are left in the felt. 


I cut out the stocking front and back. I like to use scissors with shorter blades so I have better control cutting the curves. Notice how I cut just inside the printed line so all of the stamping is removed. I rarely cut out other pieces ahead of time...it is too easy to loose a piece when it is cut out ahead of time and...if you have days, weeks or months between your work sessions you might not remember the number of the piece...many pieces can be similar enough to cause confusion.


Next, I sort the floss. The instructions list the colors in the kit and how many stands are included. Some colors are very close so I do this in the best lighting. 


You can pick up these cute little floss organizers at most crafting stores very inexpensively. Each hole has a number and I mark the number for each color on my instruction sheet...it's really a bummer when you pull the wrong floss color and start working on a section before you realize your mistake. I do sometimes substitute my own colors from my DMC floss stash because sometimes I just don't like the color match that comes in the kit. When you whip stitch a felt piece your stitches will almost be invisible if the floss matches the felt. 


I store my kit in a 2.5 gallon sized bag with a closing top. I can't wait to start stitching it!