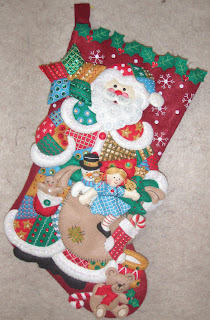
I spent several hours working on this tiny doll that fits in Santa's bag of toys.
Here's the front of the stocking all put together.
Next is the final construction. I line the inside of just the front piece of the the stocking with another piece felt.
I rarely use the backing provided in the kit. Often they aren't the color I would choose. It was the case with this kit so I pulled some burgundy felt from my stash and pressed out the wrinkles. I drew the outline in chalk of the completed top.
Here's what the backside of the front piece looks like. I like to line it so that nothing that goes into the stocking will snag any of the threads. I also think it adds a lot of body to the stocking.
I used the burgundy felt for the lining but I didn't include bumped out areas...just the basic stocking shape. I also trim it to a little less than 1/4" all around. Then I whip stitch it to the back side of the front piece. The felt is very forgiving and I stitch so that I just pick up enough of the felt with each stitch to secure it but not let my stitches show through to the front. It definitely takes a light touch.
Now it's ready for the back of the stocking to be added.
The back piece is whip stitched to the front...
In the areas where different colors come along I just stitch the base of the front with the back piece.
Here's a peek at the back where I am knotting off my thread and getting ready to start a new thread.
Here's the final stocking...all ready for next Christmas.


3 comments:
you sure do put a lot of work into those socks - this one is so cute - that little doll by itself must have taken a little while to make!
Karen
That is soooooo pretty. Are the backings of the stocking felt? Are they hand stitched to the front? How well would that stand up to years of Santa putting stuff into them?
Congrats on a stocking well finished. Beautiful job. The little doll is certainly a darling.
Post a Comment